All mobile solution free: unlock lumia WP7 phones: Release Date: November 27, 2013 Firmware Version Required : 10.3.80 [ATF JTAG] * Unlock Lumia WP7 Phones via Reading PIN and PUK Code...
Samsung Galaxy Nexus I9250 Hard Reset
Samsung Galaxy Nexus I9250 (Google) Hard Reset Done
Hard Reset :
Volume Down & Volume Up Together Then Press Power
Now Select Recovery Mode Using Volume Down
Now Press Power Switch (For Recovery Mode)
After Recovery Mode Come
You Need Press Power Then Volume Up
After Comment Enable
Now You Can Wipe
YouTube Gide
Samsung Galaxy Nexus I9250 Security Wipe - Restore - Hard Reset - Firmware 4.2.2 - YouTube

Samsung Galaxy Nexus I9250 Security Wipe - Restore - Hard Reset - Firmware 4.2.2 - YouTube
Hard Reset :
Volume Down & Volume Up Together Then Press Power
Now Select Recovery Mode Using Volume Down
Now Press Power Switch (For Recovery Mode)
After Recovery Mode Come
You Need Press Power Then Volume Up
After Comment Enable
Now You Can Wipe
YouTube Gide
Samsung Galaxy Nexus I9250 Security Wipe - Restore - Hard Reset - Firmware 4.2.2 - YouTube
Samsung Galaxy Nexus I9250 Security Wipe - Restore - Hard Reset - Firmware 4.2.2 - YouTube
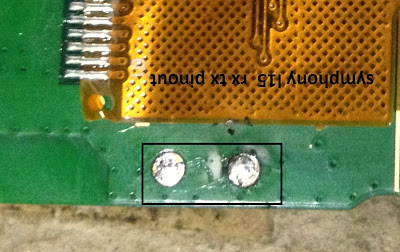
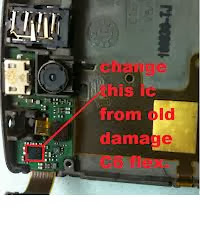
Nokia 5233 not charging problemt solution
when you do everything to solve it but you got disappointig then try this

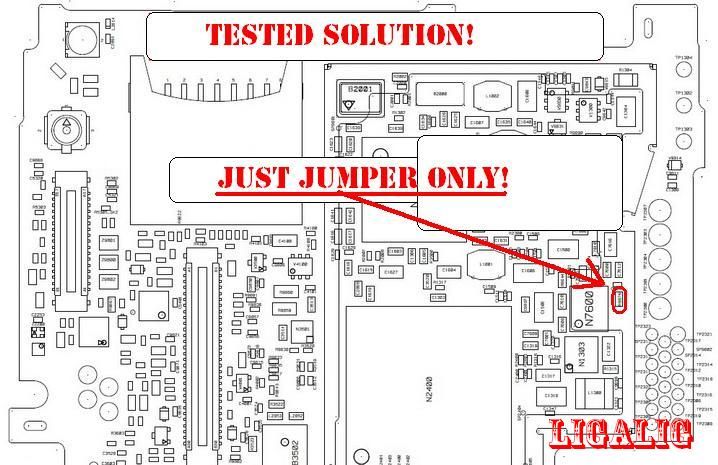
scratch here and you will found a missing print witch goes into power ic like in above image now in second image make a jumper from resistence to missing print.
i am sure you got victory on not charging.
Do it on your own risk

scratch here and you will found a missing print witch goes into power ic like in above image now in second image make a jumper from resistence to missing print.
i am sure you got victory on not charging.
Do it on your own risk
All Tablet Working Tools
Android Tablet tools 2014 About All Tablet Working Tools
Hey buddy, thanks for the quick download link for the flash file.
I've been unable to download it from any of the previous links I found on other sites.
Nice
job meh, your blog reminds me of an equally helpful and interesting
blog on my reading list
keep up the good work.


Easy to use Touch screen fixer
lOOk your touch screen Ic then select
you must have firmware android version 4.1 and UP before it work
also include touch screen calibration and a10 a13 auto wipe
firmware download 4.2.2 in GUI
easy to use
Download
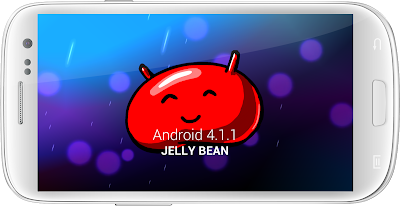
Install Android Jelly Bean 4.1.1 on Qmobile Noir A8 download now
Install Jelly Bean 4.1.1 on Qmobile Noir A8 download now
Warning: Follow the guide at your own risk, We will not be held responsible if anything goes wrong by following the steps mentioned below
Installing Jelly Bean 4.1.1 on Qmobile A8 procedure:
- First of all make sure your phone is ROOTED. If it’s not, follow out guide on
- Now install ClockWorkMod Recovery from Google play or anyother external site on your Qmobile Noir A8.
- Download one of the following two ROMs:
IncPak’s Jelly Bean 4.1.1 ROM for Qmobile Noir A8 [Link 1] [Link 2]
WinGoku’s Jelly Bean 4.1.1 ROM for Qmobile Noir A8 [Link 1]
I recommend the Incpak's ROM as it is running on 2 of my phones...
WinGoku’s Jelly Bean 4.1.1 ROM for Qmobile Noir A8 [Link 1]
I recommend the Incpak's ROM as it is running on 2 of my phones...
- Now copy this download .zip file to your SD Card;
- Power Off your Noir A8;
- Boot your phone into Recovery mode: Hold down the POWER + VOLUME UP buttons, release the POWER button when you see the boot logo;
- Make a backup: select backup and restore, then backup. When it is done select Go Back;
- Now perform the following Wipes:
Select Wipe/Data Factory Cache;
Select Wipe Cache Partition;
Go to advanced and select wipe dalvik cache;
Go back to the main menu. - Now select Select Install zip from sdcard, then Choose zip from sdcard and then select the .zip file that you copied to your SD Card and select Yes;
Once the installtion is completed, your Qmobile will reboot into JellyBean 4.1.1.
Please leave you feedback on this guide.Thank you
Please leave you feedback on this guide.Thank you
nokia 105 lcd solution
- nokia 105 white lcd light problem
- nokia 105 white display solution
- nokia 105 white display 105 white lcd solution
- nokia 105 lcd whit disply salosin
- nokia c101 whitdisply solution
- nokia 105 white lcd solution
- nokia 105 blak lcd solution
- Nokia 105 white screen problem 105 display solution
- nokia 105 lcd white display.

here is a diagram that will solve display problem in nokia 103 you can see all the links in diagram that goes to board from lcd jack.check all these prints and tracks with electronics meter and if any of them is broken make jumpers as shown.all these links are indicated with different colors so that can be identified easily.
CWM RECOVERY] ROOT and CWM Recovery For GIONEE E6
hello freinds here is the way of root and install cwm recovery of gionee E6
ROOT:-
* Install framaroot .apk
* select super su
* click on Boromir
* and reboot .... its Rooted
CWM RECOVERY:-
*Copy Recovery to root of internal storage
*Install Mobile Uncle from Play store
*Select Recovery Update From Storage
*Reboot To Recovery ........
to boot into recovery just switch off phone and power it on while pressing volume + key ..
Download Link for files:-
https://mega.co.nz/#!jxJ1RC6I!SnA7rl...BC5R3EnibHqbfY
ROOT:-
* Install framaroot .apk
* select super su
* click on Boromir
* and reboot ....
its RootedCWM RECOVERY:-
*Copy Recovery to root of internal storage
*Install Mobile Uncle from Play store
*Select Recovery Update From Storage
*Reboot To Recovery ........
to boot into recovery just switch off phone and power it on while pressing volume + key ..
Download Link for files:-
https://mega.co.nz/#!jxJ1RC6I!SnA7rl...BC5R3EnibHqbfY
History of Android OS
History of Android releases
Android is a Linux-based smartphone operating system and software platform created by Google.
Android beta
The beta release of Android OS was released on 5 November 2007. The first SDK was released a week later, on 12 November 2007
Android 1.0
Android 1.0 was the first commercially available release of the OS. It was available on the pioneering device - the T-Mobile G1 (released October 2008 in the US and the UK) along with the Android source code.
Android 1.1
Android 1.1 was pushed out on 9 February 2009, coinciding with the announcement of the HTC Dream, an internationally available twin of the T-Mobile G1.
Android 1.5 Cupcake
Android 1.5 Cupcake was released on 30 April 2009. It was the first major Android overhaul and it also was the first Android release to be pet-named after a dessert - a tradition that has been kept alive ever since. Every subsequent Android release was named after a dessert, whose name started with the next letter of the alphabet.
Version 1.5 Cupcake introduced the software on-screen keyboard to Android and allowed the production of touch devices sans QWERTY keyboards such as the HTC Magic (announced February 2009). Equally importantly, it enabled Android smartphones to shoot video.
Along with that, v. 1.5 Cupcake added support for third-party software keyboards, third-party widgets, stereo Bluetooth, copy and paste in the web browser, screen auto-rotation, and an option to upload media to YouTube and Picasa.
Android 1.6 Donut
Android 1.6 Donut was released on 15 September 2009. It added text-to-speech, updated Android Market now offered app screenshots, and it introduced support for WVGA screens. The camera became faster, and the gallery, camera and camcorder got deeply integrated with each other.
Android 2.x Eclair
Android 2.0 Eclair SDK was released on 26 October 2009. Android 2.0 introduced multiple account sync, Microsoft Exchange email support, Bluetooth 2.1, the Quick Contact feature, showing a pop-up for call, SMS and email, as soon as you tap on a contact's avatar. The camera received new features such as flash support, digital zoom, scene mode, white balance, color effect and macro focus. The web browser UI was updated and some new features were added such as double-tap to zoom.
We saw the much overdue native support for multi-touch interaction with software. Live wallpapers were first introduced with Eclair, as well. The UI was redesigned, there were multiple performance improvements and we welcomed the support for more screen sizes and resolutions.
Google Maps Navigation was also introduced alongside Android 2.0 Eclair, quickly turning into a key selling point for Android smartphones in the supported countries.
Android 2.1 was a subsequent release, which was dubbed Eclair, too, as it wasn't a major update in terms of functionality. This sort of minor upgrades between major releases became commonplace in future versions.
Along with Android 2.1 Eclair Google introduced its first Nexus devices as well. Manufactured by HTC, but sold directly by Google, the Google Nexus One was released in January 2010 and in May 2010 it also became the first phone to be updated to Android 2.2 Froyo.
Android 2.2.x Froyo
Android 2.2 Froyo SDK was released on 20 May 2010. Froyo brought significant performance improvements over Eclair. Storage access and applications became faster thanks to the added JIT compiler. The web browser got a speed boost too, courtesy of the new JavaScript engine.
Android 2.2 Froyo also introduced push notifications, USB tethering and Wi-Fi hotspot functionality, an updated Android Market with automatic updates and batch install. The web browser could use embedded file upload fields. For the first time users could officially install applications to the external memory. The Adobe Flash support was another major new feature of the web browser.
Minor revisions were later released as updates such as Android 2.2.1, 2.2.2, and 2.2.3.
Android 2.3.x Gingerbread
Android 2.3 Gingerbread SDK was released on 6 December 2010. This Android release offered an updated user interface and even better performance optimization.
It added native support for SIP VoIP internet telephony, improved text input and keyboard accuracy, enhanced copy/paste functionality (word-by-word selection), Near Field Communication (NFC) support, new audio effects such as headphone virtualization and bass boost, new system-wide download manager, and native support for a front-facing camera.
Developers also received a number of under-the-hood enhancements, giving them lower-level access to audio, graphics, and inputs, plus concurrent garbage collection for increased performance and native support for extra sensors such as gyroscopes and barometers. All this allowed devs to write faster native code.
Newer phones, which came out of the box with Gingerbread, now used the newer ext4 file system.
Android 2.3 Gingerbread however, was mainly touted for its enhanced power management, which took a more active approach to dealing with apps, which kept the phone going for much longer
As of December 2012, Gingerbread is still the most widely used release of Android in the world.
Minor revisions were later released as updates such as Android 2.3.1, 2.3.2, 2.3.4, 2.3.5, 2.3.6, and 2.3.7.
Among the more important updates of those from a user's point of view is Android 2.3.4 Gingerbread (April 2011) introduced support for voice or video chat via Google Talk. Android 2.3.5 Gingerbread (July 2011) introduced an improved Gmail app, camera enhancements, and an even better battery efficiency.
Google continued the Nexus lineup with the launch of the Samsung-made Google Nexus S (December 2010), which was the first phone publicly released with Android 2.3 Gingerbread, and also the first phone to support NFC on both hardware and software level.
Android 3.x Honeycomb
Android 3.0 Honeycomb SDK was released on 22 February 2011. It was Android's tablet-only version and was available concurrently with Android Gingerbread for phones.
Android Honeycomb introduced a new all-touch user interface, which did not rely on any physical navigation buttons. Unfortunately, it was plagued by performance issues throughout its product life.
Besides the visual differences, Honeycomb was first to introduce native hardware acceleration and support for multi-core processors. Honeycomb offered support for video calls over Google Talk even before Gingerbread smartphones did (the feature was only released in Android 2.3.4).
Later on Honeycomb was updated to Android 3.1 and 3.2 before Gingerbread and Honeycomb were both replaced by Android 4.0 Ice Cream Sandwich.
Android 3.1 added support for USB accessories such as external keyboards and pointing devices, joysticks and gamepads. Android 3.2 brought along refinements in performance via optimizations for a wider range of tablet devices.
Android 3.x Honeycomb release was not accompanied by a dedicated Nexus device, but Google widely used the Motorola XOOM as an ambassador and main demonstration platform for Honeycomb.
Android 4.0.x Ice Cream Sandwich
The Android 4.0.x Ice Cream Sandwich SDK was released on 19 October 2011.
Android ICS was released along with the Google Galaxy Nexus (November 2011) - the next successor in the popular Nexus lineup
Android Ice Cream Sandwich or ICS, as it is better known, integrated the phone and tablet branches of Android into a single edition with a common interface, which again didn't rely on physical navigation buttons.
One of the most prominent changes in the UI was that the Widgets were now moved to a tab of their own in the main menu. Numerous other changes were introduced too, such as a new typeface throughout the UI - Roboto, the ability to launch apps from the lockscreen, support for real-time speech to text dictation, Face Unlock, Google Chrome web browser came preinstlalled with tabs and syncing of bookmarks, camera with time-lapse and panorama and a built-in photo editor, data usage analysis, and new calendar and mail apps. The UI graphics and animations got hardware acceleration and Wi-Fi Direct functionality was now supported natively.
Minor revisions were later released as updates such as Android 4.0.1 and 4.0.2.
In December 2011 Android 4.0.3 was released, fixing most bugs spotted in the previous releases plus adding enhanced video stabilization.
Android 4.0.4 is another minor update, which further enhanced the performance of the OS.
Further minor revisions were later released as updates ranging from Android 4.0.4 to 4.0.5 and 4.0.6.
Android 4.x Jelly Bean
Android 4.1 Jelly Bean SDK was released on 9 July 2012. A new version 4.2 was released later on under the same Jelly Bean moniker.
Android 4.1 Jelly Bean has a focus on performance, aiming to get rid of stutter by introducing Vsync (Vertical synchronization) of the timing of the frames output and the screen's refresh rate. Also, Jelly Bean adds triple buffering in graphics.
Instead of a smartphone, Google chose to display a tablet along with its Android 4.1 Jelly Bean release - the Google Nexus 7 (July 2012) was meant to show that Jelly Bean looked equally good on a tablet screen.
Beyond performance, there are other interesting features such as, offline voice recognition and dictation, expandable notifications, USB audio output and HDMI multichannel audio output, App encryption and Smart App updates. The Roboto font has also been refreshed, widgets are now dynamically resizable, and word prediction has been updated, too. Google Now is also a pretty big deal - it processes various data about your location, time of day, your schedule, etc. - and it shows you a pack of information cards, which it deems important to you in the current context. It also supports an advanced natural language voice search function, which is quite flexible.
Minor revisions of 4.1 Jelly bean were later released as updates such as Android 4.1.1 and 4.1.2.
On top of those, Android 4.2 added multiple user accounts, native settings shortcuts right in the notifications pane, Photo Sphere camera mode, gesture typing, wireless screen streaming (over the Miracast protocol), the dynamic "Daydream" screensaver, widgets on the lockscreen and further stability improvement
A minor revision of Android 4.2 was later released as an update - Android 4.2.1. Most importantly it added native support for Bluetooth gamepads and joysticks.
The release of the Android 4.2 was supported with the announcement of a fourth Nexus smartphone - the LG-made Google Nexus 4 (November 2012).
Not only that, but Google also unveiled a 10-inch tablet - the Samsung-made Google Nexus 10.
Android Key Lime Pie and beyond...
The next version of Android is yet to be announced, but rumors have it that it would be dubbed "Key Lime Pie".

developers tools

Features:
You can send the bootanim in ADB if you enable debug or create a zip and flash it.
You can also resize the image or the display to correspond to your resolutions.
You can add your own animations, just create a directory in "bootanimations" program and put the bootanimation.zip file there.
Download
Samsung i9505 imei repair solution
How to repair imei i9505 android ver 4.3 with asansam box
-Open asansam
-Select model
-Goto Flah/unlock Tab
-Press Flash button
-Select
I9505 modem patch File for Unlock and imei repair 4.3.tar
file in pda and then write flash
-Wait for phone reboot
-Insert usb to phone again
-Eanble 1 in setting
-Goto general service tab
-Enter new imei
-Set phone modem port in port setting
-Press repair imei button
GPGJTAG V2.47 ADDED Nokia Lumia 820,920 and Samsung I9505G!
GPGIndustries Present You Our New Update GPGJtag V2.47!
GPGJtag V2.47,added support for Nokia Lumia and samsung phones!
GPGJtag V2.47 Release Notes:
Added support for the following models:
Nokia Lumia 820 Boot Repair.
Nokia Lumia 920 Boot Repair.
Samsung I9505G Boot Repair.
Download GPGJtag V2.47 -> GPGJtag V2.47.
GPGJtag V2.47,added support for Nokia Lumia and samsung phones!
GPGJtag V2.47 Release Notes:
Added support for the following models:
Nokia Lumia 820 Boot Repair.
Nokia Lumia 920 Boot Repair.
Samsung I9505G Boot Repair.
Download GPGJtag V2.47 -> GPGJtag V2.47.
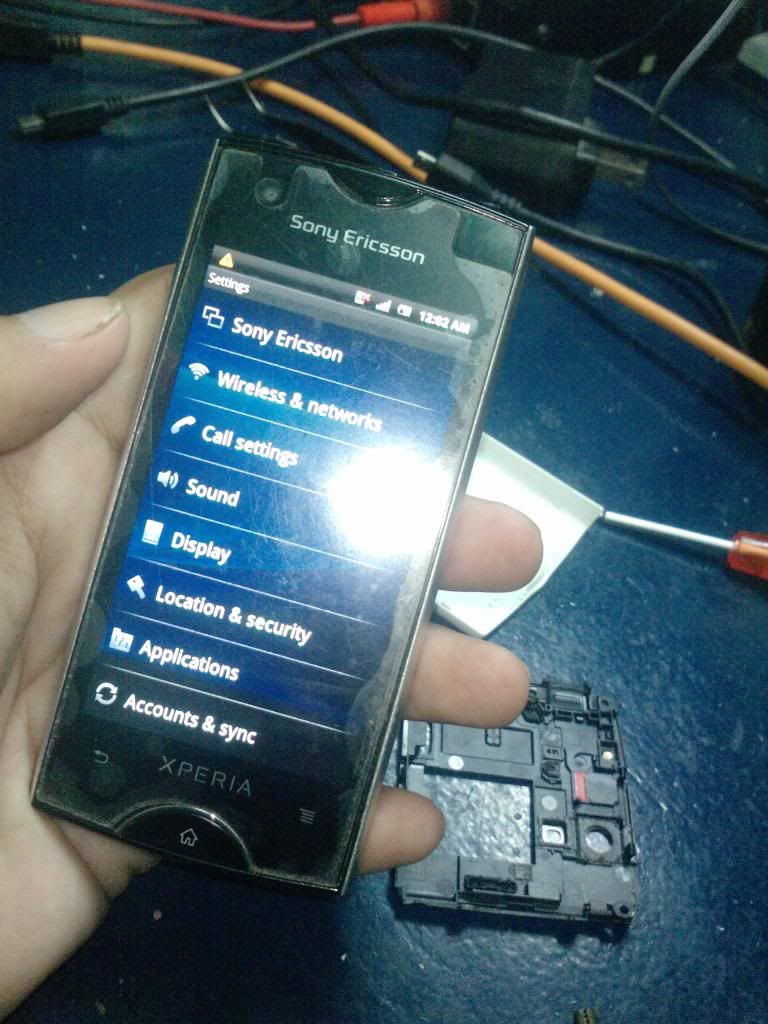
Sony Ericsson ST18i No Display Solution
PROBLEM/MODEL:ST18i XPERIA RAY NO LIGHTS/NO DISPLAYSOLUTION:JUST FOLLOW THIS PICTURE :tgy
Sony Xperia ST18i display and display light ways
1. try the five-point jumper to his lcd pin (see picture below)
if the lcd is still as before rehot or replace third emi filter lcd
2. if its lcd light not work after the fifth point jumper pin
lcd ..... replace the L7600 and V7601
open its schematic diagram
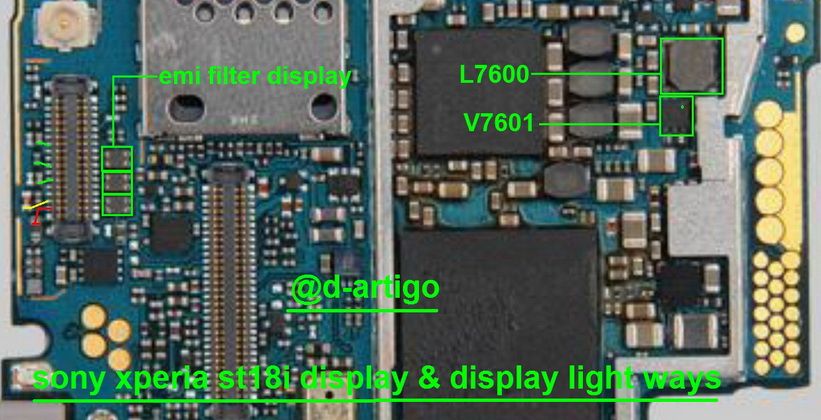

Walton Primo X1 flash file flash tools and drivers
Walton Primo X1 Software, Flashtools and Drivers
1. Install driver.
2. Open Flash Tool
3. Open Download Agent and select MTK_AllinOne_DA
4. Open scatter_loading and select scatter file
Software-> WBWS305WA_0201_T5056 -> MT6589_Android_scatter_emmc.txt
5. Click Firmware->Upgrade and connect USB cable with mobile Off
6. Then start downloading..
7. When it shows Firmware Upgrade , then installation is completed.
After Firmware Upgrade give Reset to Factory Setting
FILE & TOOLS
Walton Android Primo Series Phone Firmware Update Tools
Walton Android Primo series Phone firmware & update tools
Walton Primo N1 Software, Flashtools and Drivers
1. Install driver.
2. Open Flash Tool
3. Open Download Agent and select MTK_AllinOne_DA
4. Open scatter_loading and select scatter file
Software-> WBW5883WA_0301_T5393 -> MT6589_Android_scatter_emmc.txt
5. Click Firmware->Upgrade and connect USB cable with mobile without battery
6. Insert Battery then start downloading..
7. When it shows Firmware Upgrade , then installation is completed.
After Firmware Upgrade give Reset to Factory Setting
FILE
DOWNLOAD


Samsung tablet gp707 model t98 hang in logo solution

Firmware link:http://wwonetelecom.com/upload/2/(14...30301@2in1.rar
Flash Tool is LiveSuit:http://www.topnotchtablets.com/files...Pack_v1.07.zip
How to?
Extract LiveSuit; Turn off the tablet , hold volume+ and plug in usb and wait windows ask to install driver. (the diver is inside LiveSuit folder)
After driver install,see Livesuit tuto How to flash tablet with livesuit - YouTube or Livesuite Guide : Allwinner A1x - SlateDroid.com to guide.
Arnova update the software
How to install a firmware.
Firmware is another name for Operating System (OS) or System Software. Below, you will find the instructions and the latest software to update your specific Arnova device. You do not have to install all the updates, only the most recent one. Each update takes into account all the previous updates unless specified otherwise.
| How to update the software of your Arnova |
1. Download the update file for your device « update.img » or « update.zip ». You can save it to the desktop of your computer for example. 2. Connect the USB cable to your Arnova and your computer so that the ARNOVA is seen as an external hard drive (as normal). 3. Copy the « update.img » or « update.zip » to the root of the device. Do not place it into any folder of the Arnova, just to the root level of the device. 4. Unplug your device safely as usual using the green « disconnect safely » arrow in the system tray. 5. The Arnova will find the update automatically and display a message box offering to install this new firmware. Before tapping on "Install", you need to connect the charger/adapter DC-IN to your device. The Arnova will find the update automatically and display a message box offering to install this new firmware. Before tapping on "Install", make sure you connect the charger/adapter to the DC-IN of your device. Important warning: Upgrading your device's software will reset all your settings (including the WiFi settings). |